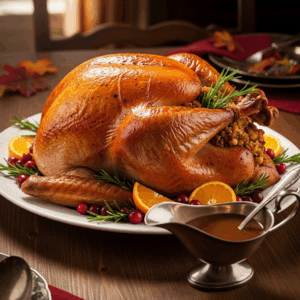


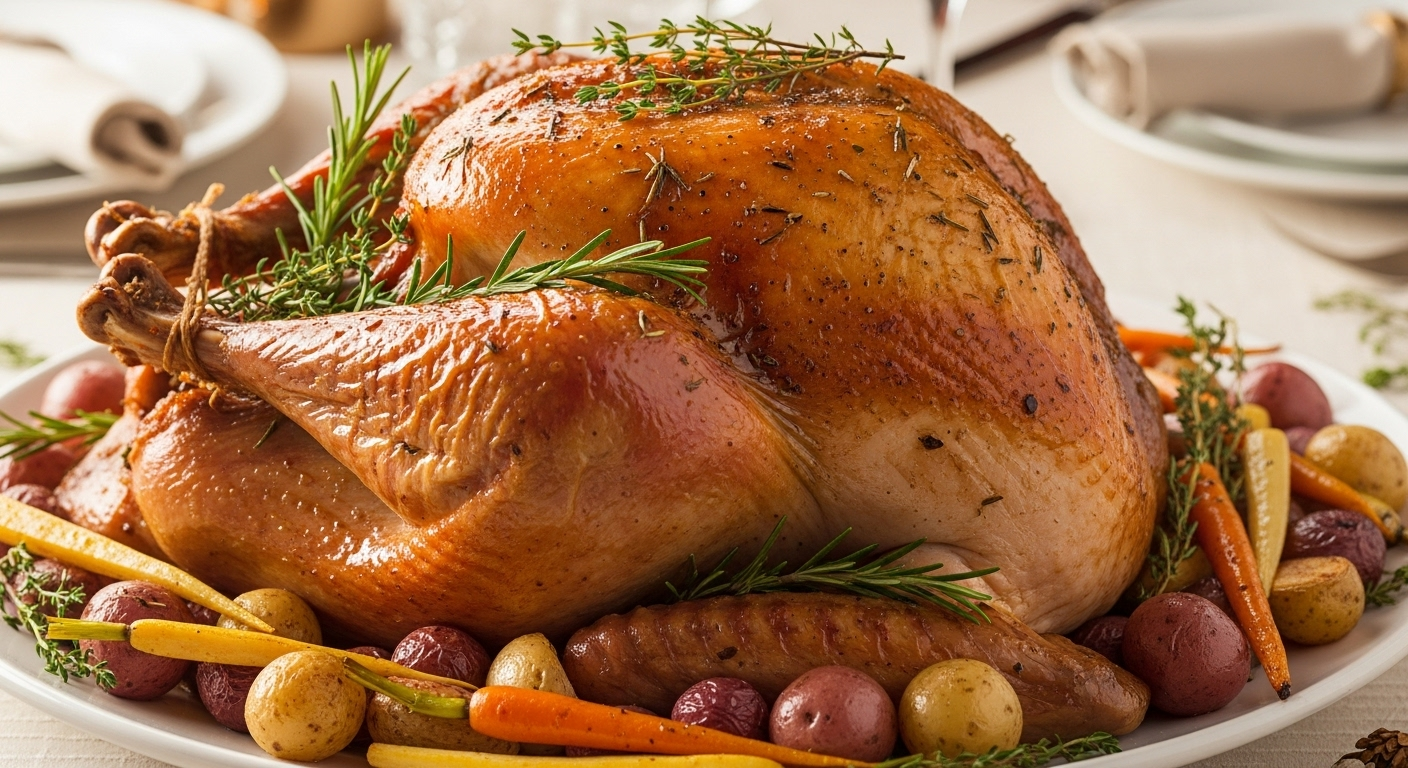
There’s something truly magical about a perfectly roasted turkey-the crisp, golden skin giving way to tender, juicy meat that melts in your mouth. Yet, achieving that idyllic balance between moistness and flavor can feel like an elusive culinary dream. Whether you’re a holiday rookie or a seasoned kitchen veteran,mastering the art of turkey roasting is a rite of passage that transforms an ordinary meal into a memorable feast. In this article, we’ll uncover expert tips and time-tested techniques to help you unlock the secrets to turkey juiciness, ensuring your bird emerges from the oven tender, flavorful, and absolutely irresistible every single time.
Master the Art of Turkey Roasting: Tips for Perfect Juiciness unlocks the secrets behind turning a simple bird into a memorable centerpiece bursting with rich flavors and moist tenderness. Whether it’s your first time at the roasting rack or you’re honing your holiday technique, understanding how to prepare, roast, season, and carve your turkey can transform your meal-and your reputation as a host.
Prep and Cook Time
- Readiness: 30 minutes (plus overnight brining, if desired)
- Cooking: 3 to 4 hours, depending on turkey size
Yield
Serves 10 to 12 guests comfortably, perfect for family gatherings and festive celebrations.
Difficulty Level
Medium – Requires some attention to detail but rewarding for home cooks of any experience.
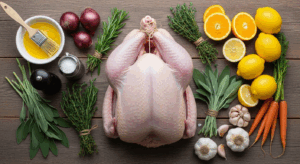
Ingredients
- 1 whole turkey (12-14 lbs), thawed if frozen
- 1/2 cup kosher salt (for brining)
- 1/2 cup brown sugar (for brining)
- 1 gallon cold water (for brine)
- 4 tbsp unsalted butter, softened
- 4 garlic cloves, minced
- 1 tbsp fresh rosemary, finely chopped
- 1 tbsp fresh thyme, finely chopped
- 1 tbsp fresh sage, finely chopped
- 1 tsp freshly ground black pepper
- 1 lemon, quartered
- 1 onion, quartered
- 4 celery stalks, cut into large chunks
- 2 cups low-sodium chicken broth
Instructions
- Brine the Turkey: In a large stockpot, dissolve kosher salt and brown sugar in 1 gallon of cold water. Submerge the turkey completely and refrigerate for 12 to 24 hours. This step infuses the meat with moisture and dramatically enhances juiciness.
- Prepare the herb Butter: In a small bowl, combine softened butter with garlic, rosemary, thyme, sage, and black pepper until well mixed.
- Rinse and Dry: Remove turkey from brine, rinse under cold water, and pat thoroughly dry with paper towels. Dry skin crisps up beautifully during roasting.
- Butter Under the Skin: Using your fingers, gently separate the skin from the breast meat and rub half the herb butter directly onto the meat. Spread the remaining butter all over the skin for even flavor and a gorgeously golden crust.
- Stuff the Cavity: Fill the turkey cavity with lemon quarters, onion, and celery. these aromatics steam gently from inside, adding layers of subtle flavor.
- Truss and Position: Tie the legs together with kitchen twine and tuck wings under the body to ensure even roasting. Place the turkey breast side up on a roasting rack inside a large roasting pan.
- Choose Your roasting Technique: Preheat oven to 325°F (165°C). Roast the turkey uncovered, basting occasionally with pan juices for the first two hours. For an extra moist outcome, cover the breast loosely with foil halfway through cooking-this prevents over-browning and locks in moisture.
- Monitor Internal Temperature: Use a meat thermometer inserted into the thickest part of the thigh without touching bone.Remove the turkey when it reaches 165°F (74°C) to ensure perfect doneness.
- Rest Before Carving: Tent the turkey loosely with foil and let it rest for 30 to 45 minutes. This allows juices to redistribute, maximizing tenderness and preventing dry meat when sliced.
- Carve Thoughtfully: Use a sharp carving knife to slice skin-on breast meat into even slices, cutting against the grain to preserve tenderness. separate thighs and legs with smooth, clean cuts, preserving juicy pieces for every plate.
Tips for Success
- For an even deeper flavor, consider brining your turkey overnight. This simple step is a game-changer in moisture retention.
- Always use a thermometer; cooking times vary widely depending on turkey size and oven calibration.
- Don’t skip resting-impatience here will let precious juices run dry.
- Boost the herb butter by swapping in fresh tarragon or marjoram based on your palate.
- If you can’t brine, a dry rub of salt and herbs under the skin also locks in flavor effectively.
Serving suggestions
Present your turkey on a large platter garnished with fresh rosemary sprigs and lemon wedges for a vibrant visual and aromatic appeal. Accompany with classic sides such as creamy mashed potatoes, roasted root vegetables, and a tangy cranberry chutney for a balanced holiday feast.Don’t forget a drizzle of the savory pan jus to elevate each tender slice.

| Nutrition (per serving) | Amount |
|---|---|
| Calories | 380 kcal |
| Protein | 52 g |
| Carbohydrates | 2 g |
| Fat | 14 g |
discover more expert turkey techniques in our thorough brining guide,or deepen your poultry skills through trusted culinary resources like food Network’s turkey recipe collection.
Q&A
Q&A: Master the Art of Turkey Roasting – tips for Perfect Juiciness
Q1: What’s the secret to roasting a juicy turkey instead of a dry one?
A1: The secret lies in a combination of proper brining, maintaining an even temperature, and not overcooking. Brining helps the meat retain moisture, while roasting at a steady, moderate heat ensures the juices stay locked inside. Also,resting the turkey after roasting allows the juices to redistribute,making every slice tender and succulent.
Q2: How crucial is brining, and should I use a wet or dry brine?
A2: Brining is a game-changer for juiciness. Wet brining involves soaking the turkey in a saltwater solution,which enhances moisture retention and flavor. Dry brining uses salt and seasonings rubbed directly onto the skin and meat, drawing out the turkey’s natural juices and then reabsorbing them. Both are effective-dry brining is often easier and results in crispier skin, while wet brining can add a subtle seasoning depth.
Q3: What roasting temperature yields the best results?
A3: Roasting at a moderate temperature between 325°F (163°C) and 350°F (177°C) allows the turkey to cook evenly without drying out. Starting too hot risks drying the breast meat,while too low might extend cooking time unnecessarily. some cooks also swear by starting hot (around 425°F for 30 minutes) to crisp the skin, then lowering the temperature for gentle cooking.
Q4: Is it necessary to baste the turkey during roasting?
A4: Basting can improve flavor and help with browning, but it’s not a must-have for juiciness if you’ve brined well and maintained the right temperature. Basting cools the surface slightly each time you open the oven, which can lengthen cooking time. Alternatively, roasting over a bed of aromatics or butter helps keep the turkey moist from underneath.Q5: How do I know when my turkey is perfectly cooked?
A5: The most reliable method is to use a meat thermometer. Insert it into the thickest part of the thigh without touching bone; the internal temperature should reach 165°F (74°C). Remove the bird a few degrees before-it will continue to cook while resting.
Q6: What role does resting the turkey play after roasting?
A6: Resting is essential! Let your turkey rest tented loosely with foil for at least 20 to 30 minutes. This pause lets the muscle fibers relax and reabsorb juices that would otherwise spill out when carving. The result? Moist, flavorful slices instead of dry, stringy meat.
Q7: Can I stuff my turkey and still ensure it stays juicy?
A7: Stuffing the turkey can add flavor, but it also increases cooking time and makes it trickier to judge doneness.If you choose to stuff, use a loosely packed stuffing and be extra vigilant with a thermometer-both the stuffing and the turkey’s thickest parts must reach 165°F (74°C) to be safe and delicious.
Q8: Any tips to keep the breast meat especially juicy?
A8: Since the breast cooks faster and tends to dry out, consider techniques like covering it with foil partway through roasting or placing butter or oil beneath the skin. Additionally, carving breast meat against the grain and slicing it thickly preserves juices and texture.
Q9: What types of seasoning or aromatics best complement a juicy turkey?
A9: Classic herbs like rosemary, thyme, sage, and garlic enhance the turkey’s natural flavors without overpowering them. Aromatic vegetables such as onions, carrots, and celery can be roasted beneath the bird to infuse subtle depth. Don’t forget citrus zests or slices for a luminous, fresh note.
Q10: How can I elevate the turkey beyond the customary roast?
A10: Experiment with roasting techniques like spatchcocking, which involves removing the backbone and flattening the bird to cook faster and more evenly. Try butter or herb compound rubs under the skin for extra flavor and moisture. Lastly, finishing the turkey with a lightly crisped skin under the broiler adds irresistible texture and appeal.
Master these tips, and your turkey will emerge from the oven moist, flavorful, and perfectly roasted-a show-stopping centerpiece for any festive table!
In Retrospect
As the aroma of your perfectly roasted turkey fills the room, you can finally savor the rewards of careful preparation and mindful cooking. Mastering the art of turkey roasting isn’t just about following a recipe-it’s about understanding the delicate balance of heat, time, and technique that transforms this classic centerpiece into a juicy, flavorful masterpiece. With these tips in your culinary toolkit,each roast promises tender bites and golden skin that will impress family and friends alike. So next time you embark on this festive tradition, remember: patience, precision, and a little passion are your secret ingredients to turkey roasting perfection. Happy cooking!